Brand Templates
Brand Templates keep a reusable visual treatment in one place. Depending on the template, that treatment can include the aspect ratio, clip layout, captions, logo placement, intro, and outro.
You work with templates in two places:
- Studio → Brand previews and applies a template to the current project.
- Brand Templates creates and maintains the reusable template itself.
Apply a template in Studio
Open a ready project, wait for its clips to finish caching, and select the
Brand tab in the right panel.
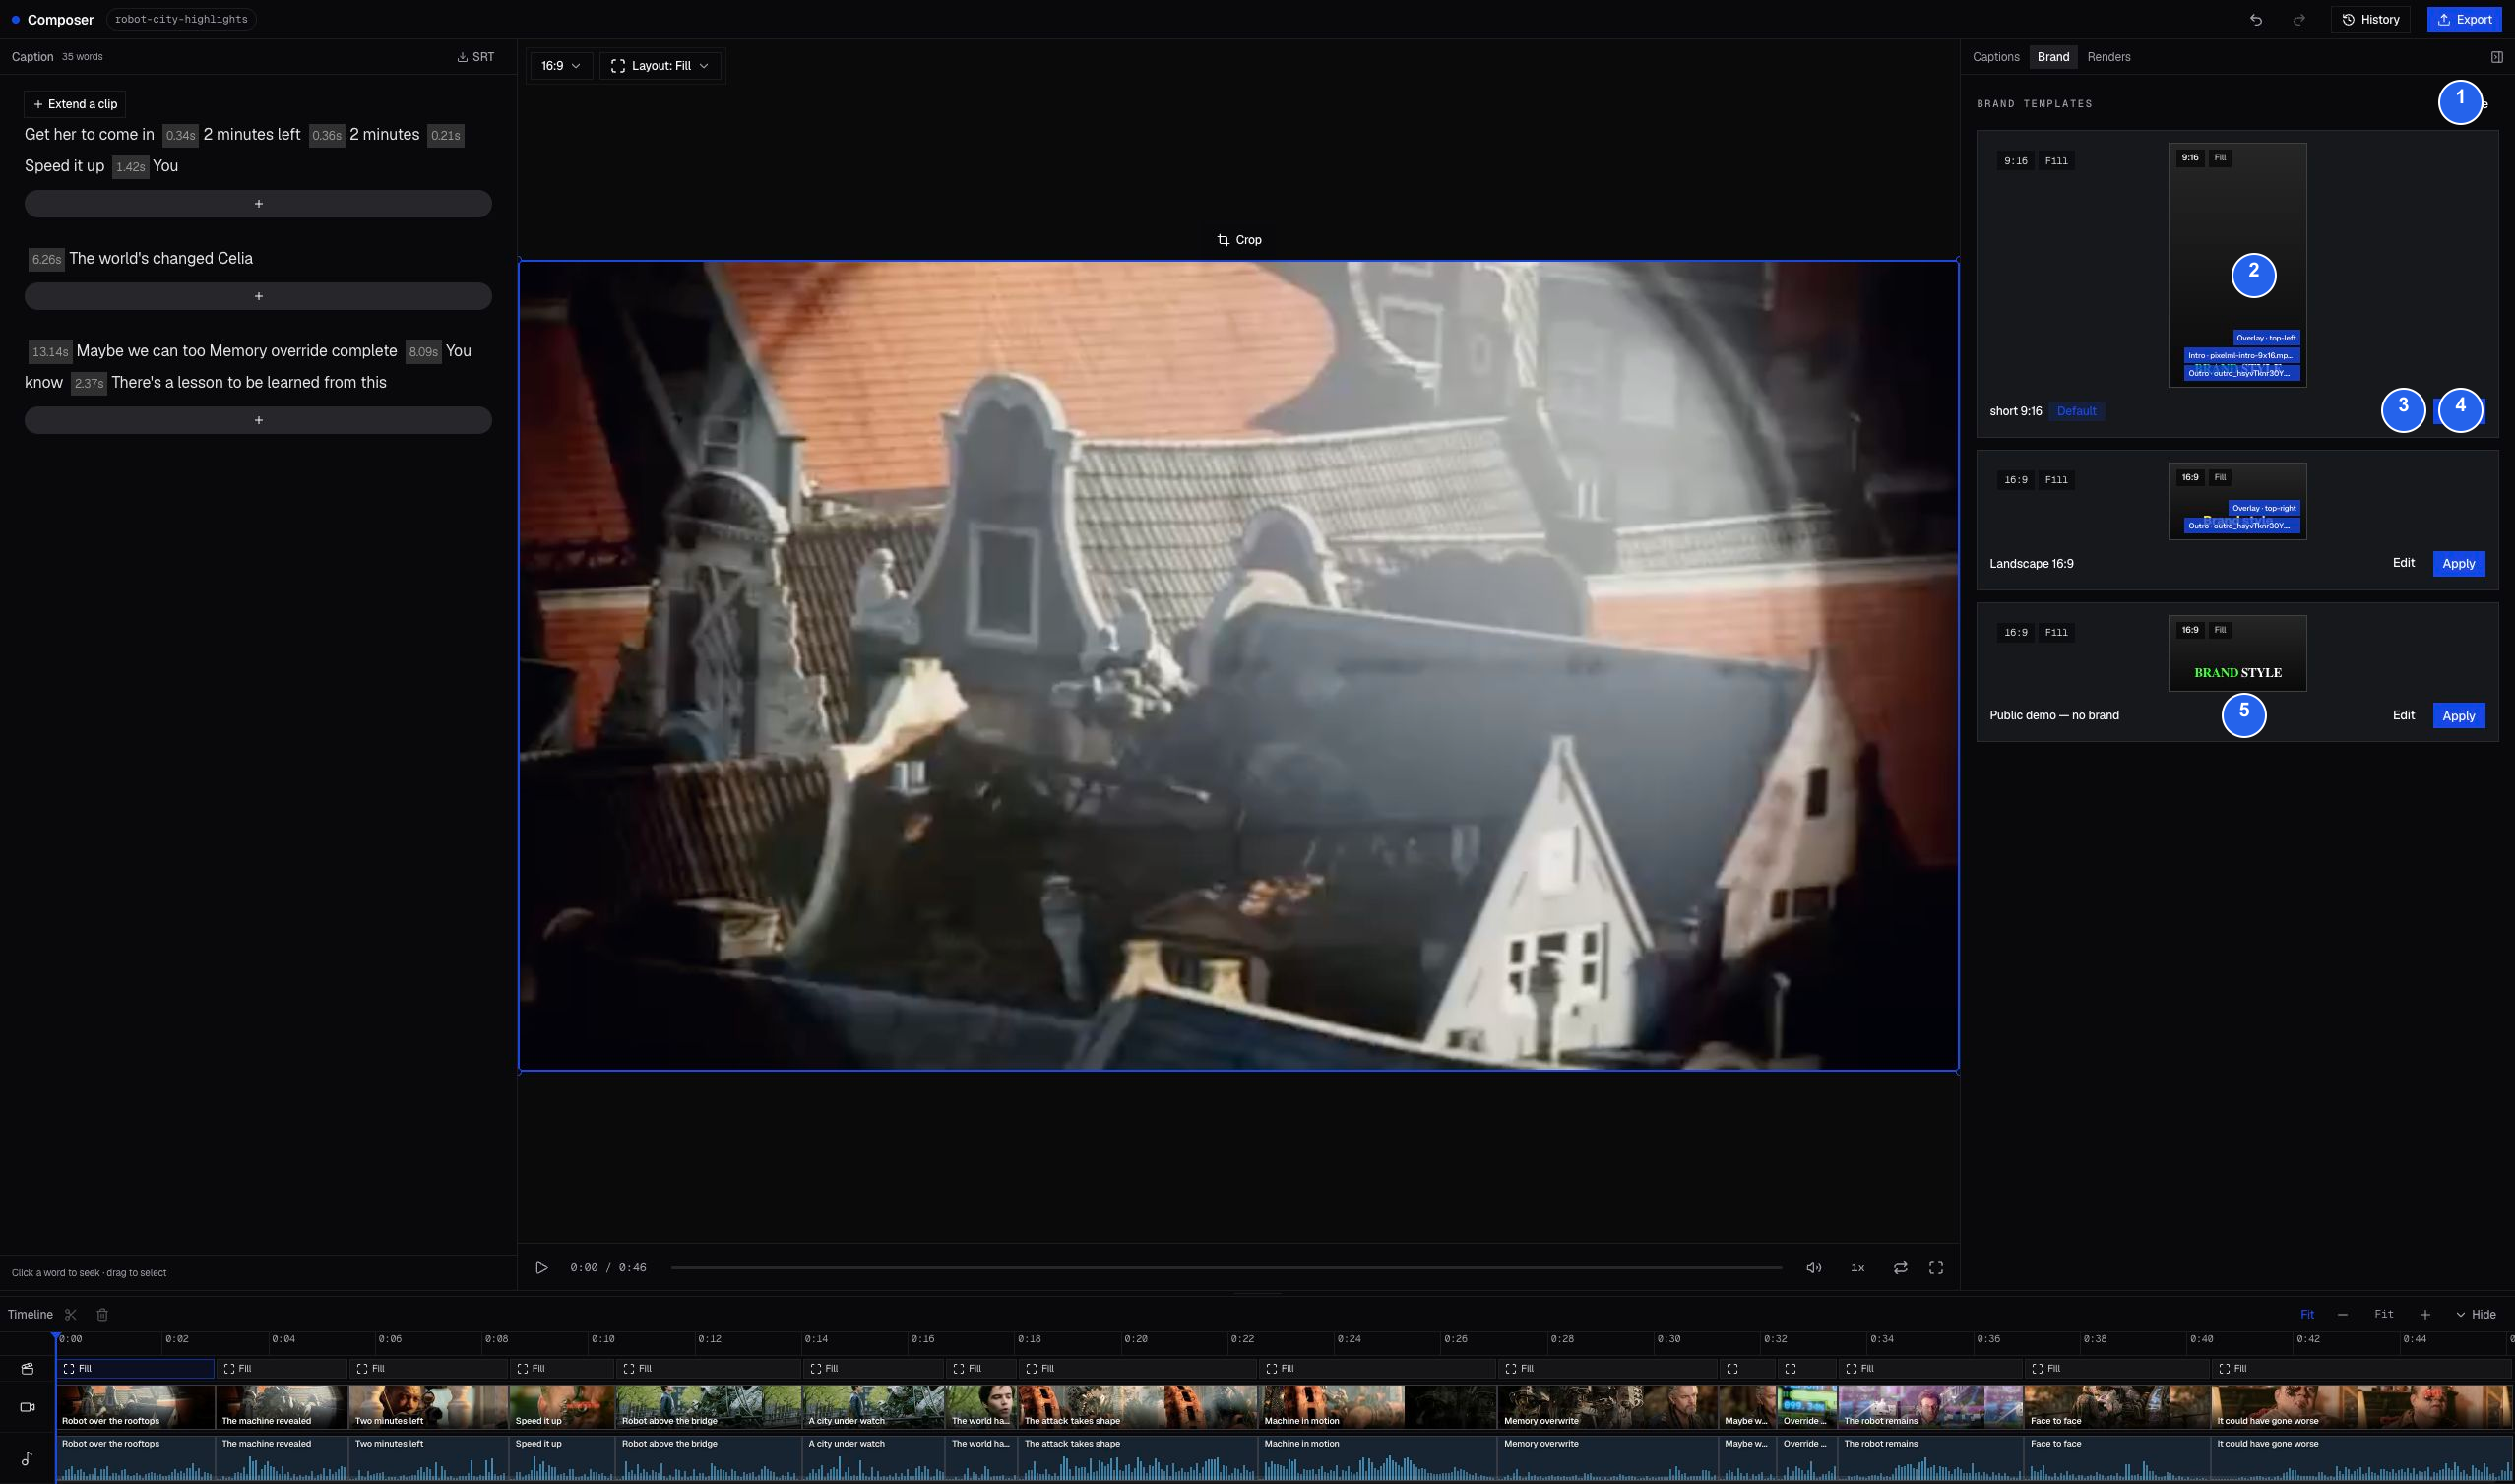
| Number | What it does |
|---|---|
| 1 | Manage opens the Brand Templates workspace. |
| 2 | The card preview summarizes the template’s ratio, layout, logo, intro, and outro. Default marks the workspace default. |
| 3 | Edit opens that reusable template without applying it. |
| 4 | Apply updates the current project with the selected treatment. |
| 5 | A no-brand template is useful when a project should keep a neutral visual treatment. |
Applying a template changes the current project, not the saved template. Review the opening, body clips, captions, logo safe area, and ending before exporting. If the result is not right, use Studio history or apply another template.
Manage templates from the Brand Templates tab
Select Brand Templates in the main navigation, or open it from Manage or
Edit in Studio. This workspace is where you create, preview, and maintain the
reusable treatment that Studio applies to a project.
The workspace has three main areas:
| Area | What you can do |
|---|---|
| Template switcher | Open an existing template, create a new one, set the workspace default, edit its name and settings, or delete it. |
| Settings | Configure the reusable layout, caption, overlay, intro/outro, and Reframe behavior. |
| Template preview | Play the sample sequence, mute or unmute it, scrub the playhead, and check changes before saving. |
Undo and Redo move through changes made during the current editing session.
Save template becomes available after the template has unsaved changes.
Configure each template setting
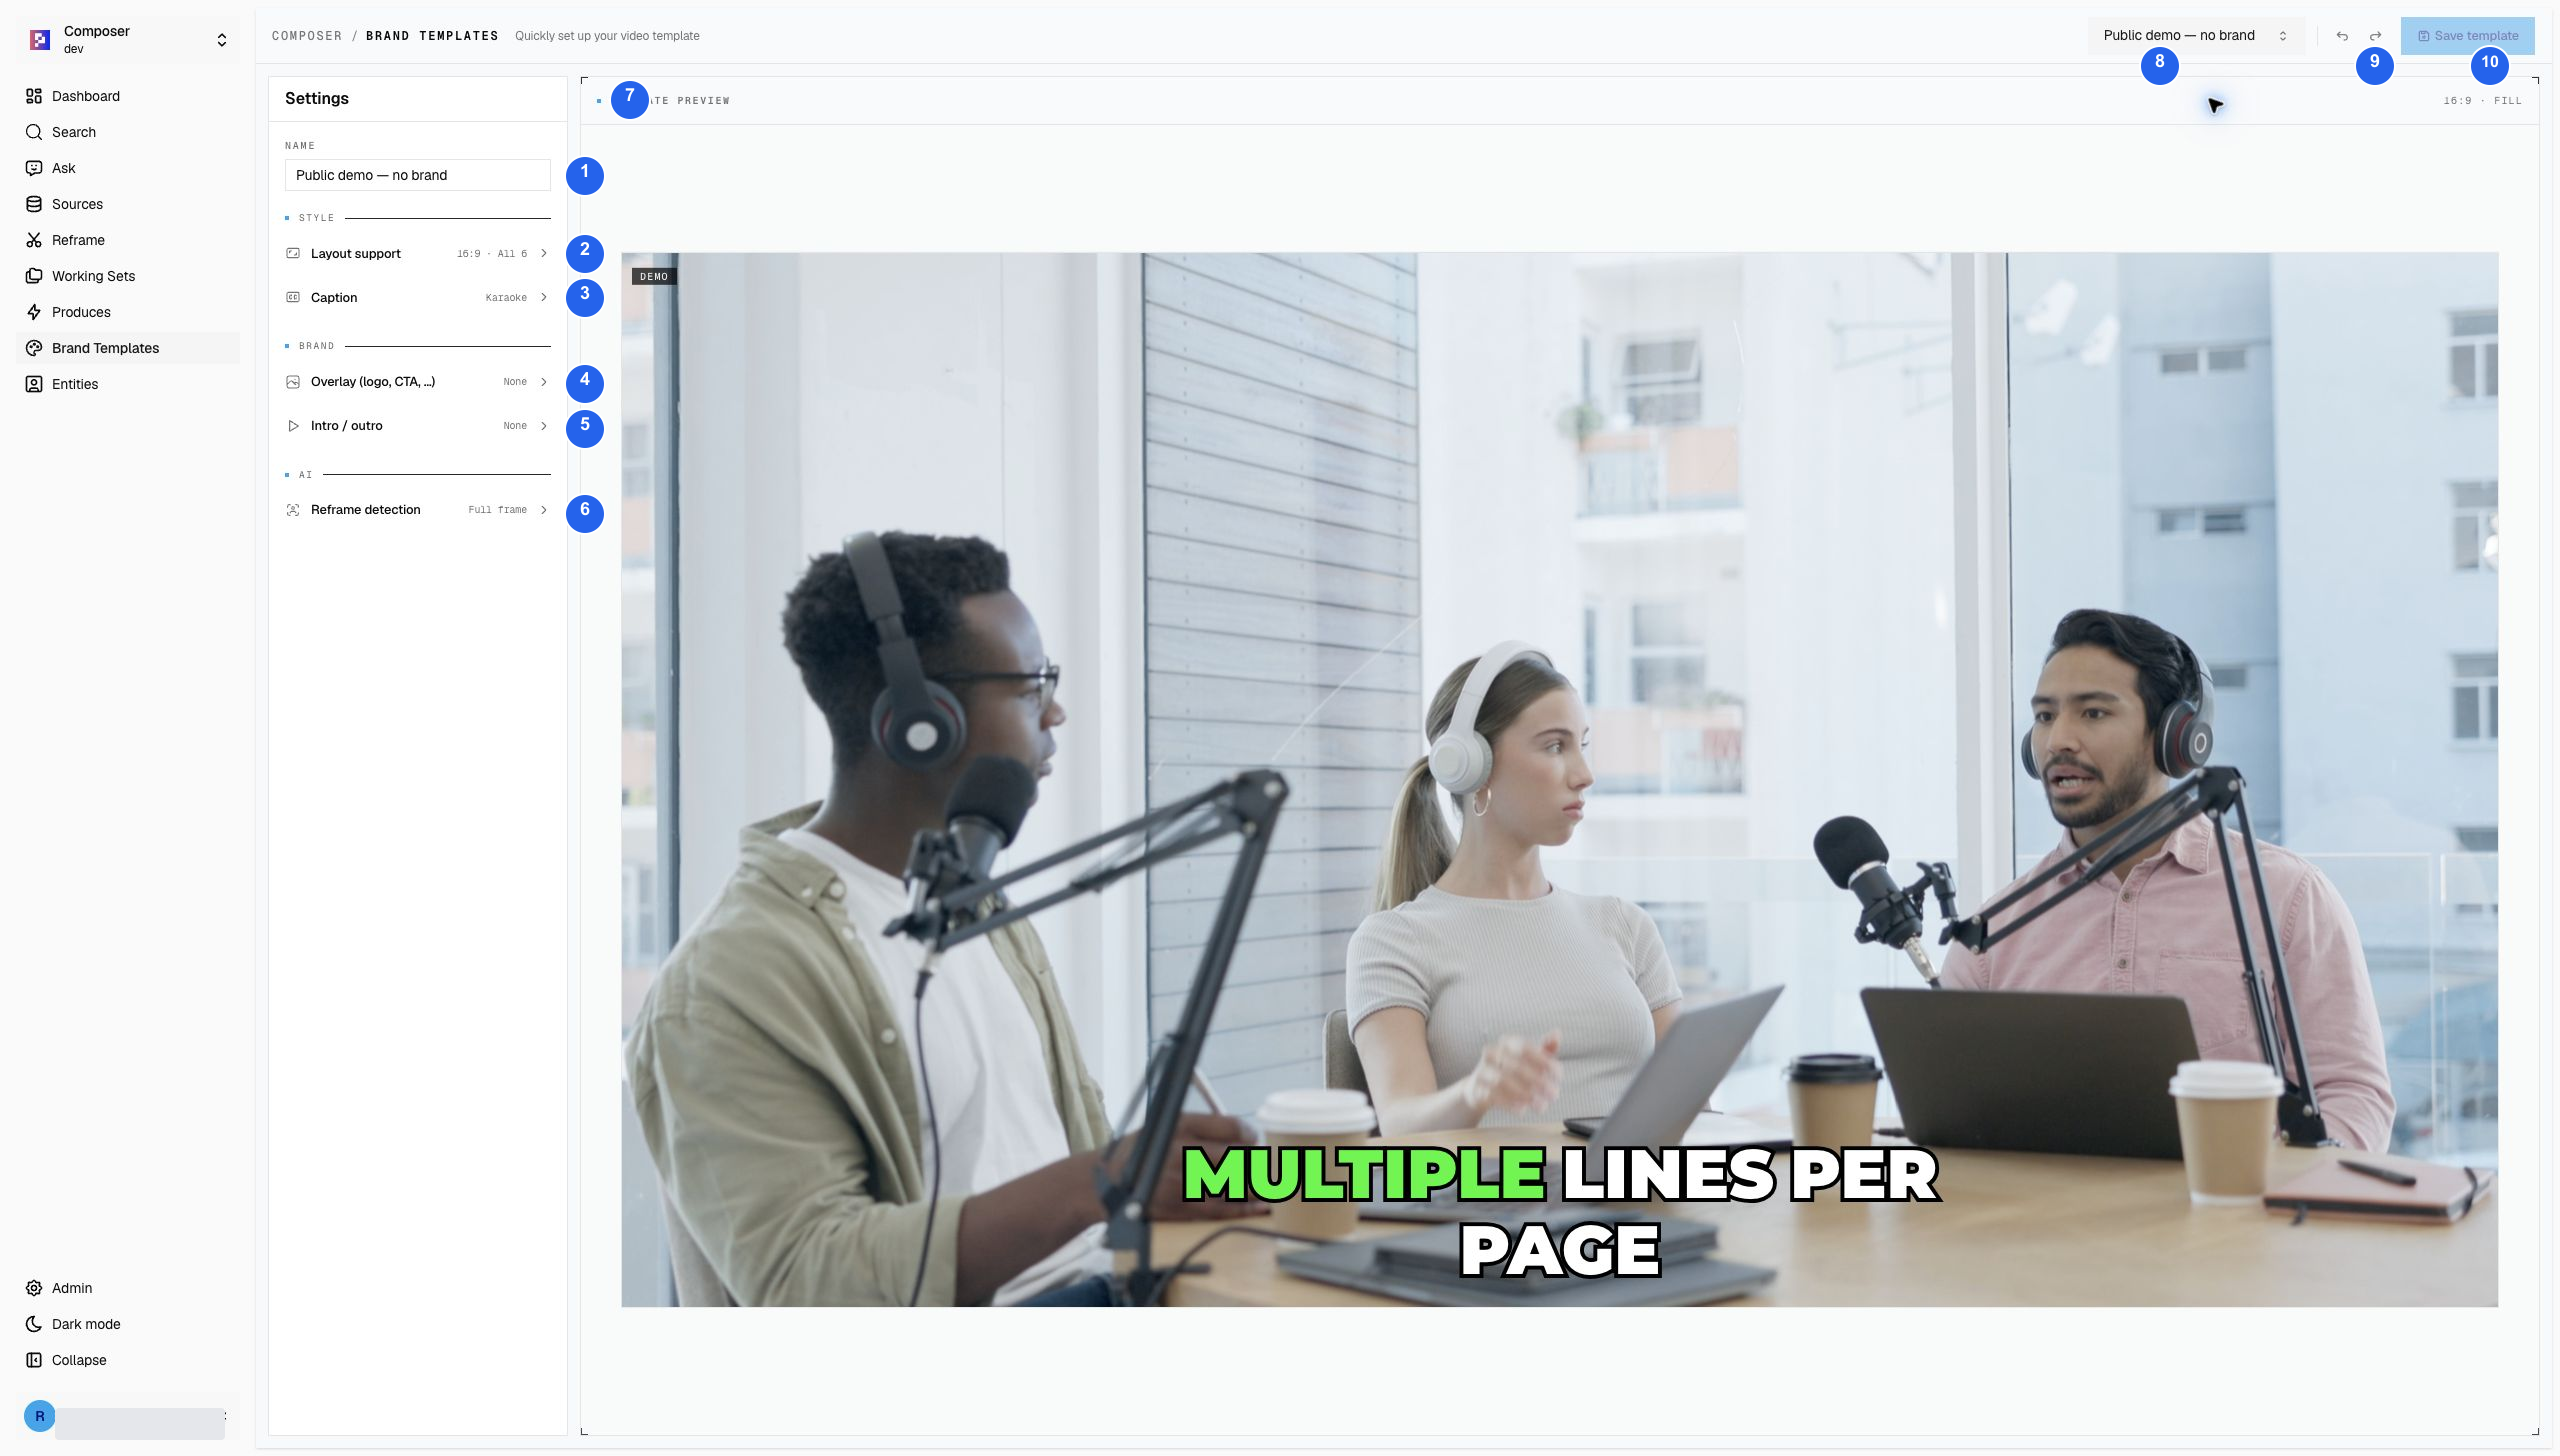
| Number | Control | What it does |
|---|---|---|
| 1 | Name | Sets the reusable name shown in the switcher and Studio’s Brand tab. |
| 2 | Layout support | Sets the aspect ratio and the scene layouts supported by the template. |
| 3 | Caption | Opens caption presets, font controls, effects, and free placement. |
| 4 | Overlay | Uploads and positions a logo, watermark, or call-to-action image. |
| 5 | Intro / outro | Adds opening and closing media to the complete template sequence. |
| 6 | Reframe detection | Defines an optional excluded region used while Reframe detects speakers. |
| 7 | Template preview | Plays and scrubs the illustrative sequence so you can review visible changes. |
| 8 | Template switcher | Opens another template or starts a new reusable template. |
| 9 | Undo / Redo | Moves backward or forward through edits in the current session. |
| 10 | Save template | Saves the reusable settings after the template has unsaved changes. |
Name
Use a short name that tells editors when to choose the template, such as a
channel, campaign, or output format. The name appears in both the template
switcher and Studio’s Brand tab.
Layout support
Choose the template’s aspect ratio: 9:16, 1:1, 16:9, or 4:5. Then review
the six supported Studio scene layouts: Fill, Fit, Split, Three, Four,
and Gameplay. Hover or focus a layout to preview it before saving.
Caption
Choose No captions or start from a caption preset. Use the three configuration
tabs when the preset needs adjustment:
Presetschanges the overall caption treatment.Fontcontrols family, color, size, weight, decoration, case, stroke, and shadow.Effectscontrols position, animation, line count, and highlighted-word color.
For free placement, drag the caption on the preview. It snaps to the center and safe-area guides; arrow keys nudge it in one-percent steps.
Overlay
Upload an image overlay such as a logo, watermark, or call to action. After the upload, use the available position and size controls to keep it inside the safe area and away from faces, captions, and important source text.
Intro and outro
Upload a short intro clip, an outro clip, or both. The preview plays them before and after the sample content so you can check the full template sequence rather than reviewing the body treatment in isolation.
Reframe detection
This setting is used only while Reframe detects active speakers. Enable an
excluded region when a fixed on-screen interpreter or another persistent person
should not pull the framing away from the main speaker.
Reframe detection does not affect Produce, Studio, or visible pixels in the
rendered video.
Save and verify the template
- Open an existing template from the switcher or select
Create new template. - Name it and configure each relevant setting.
- Play and scrub the complete preview sequence.
- Use
UndoorRedoif a recent change is not right. - Select
Save template, then apply it to a Studio project for a final content-specific review.
The workspace preview is illustrative. The source footage, shot composition, caption length, and safe areas vary by project, so always review the applied result in Studio before exporting.
Default and deletion behavior
Set a template as the workspace default when it should be the preferred starting treatment for compatible projects. A default is still reviewable and replaceable in Studio.
Deleting a reusable template does not rewrite projects that already used it. Those projects keep their applied visual settings, but the deleted template can no longer be selected for new work.
Final check
After applying a template, play the project from beginning to end and confirm:
- the project ratio and clip framing are correct;
- captions remain readable inside the safe area;
- the logo does not cover faces or important text;
- intro and outro media play at the expected length;
- the saved project looks the same after reopening Studio.